
How to Remove a Chain Link Without Damaging the Chain
Working with chains—whether on a bicycle, a conveyor belt, or heavy industrial machinery—eventually requires maintenance. At some point, you will need to shorten a chain, replace a damaged section, or break it apart for cleaning. Learning how to remove chain link properly is a fundamental skill for mechanics, DIY enthusiasts, and industrial operators.
However, chain removal isn’t as simple as grabbing a hammer and striking a pin. Improper technique is the fastest way to ruin an otherwise perfectly good chain. If you force a pin out at the wrong angle or use the wrong tool, you risk bending the side plates, cracking the rollers, or compromising the structural integrity of the surrounding links. A damaged chain is a safety hazard; it can snap under load, causing injury or expensive equipment downtime.
This guide covers everything you need to know about the process. We will look at the anatomy of a chain, the specific tools required, and a detailed step-by-step method on how to remove a link from a chain without causing damage.
Understanding Chain Link Construction
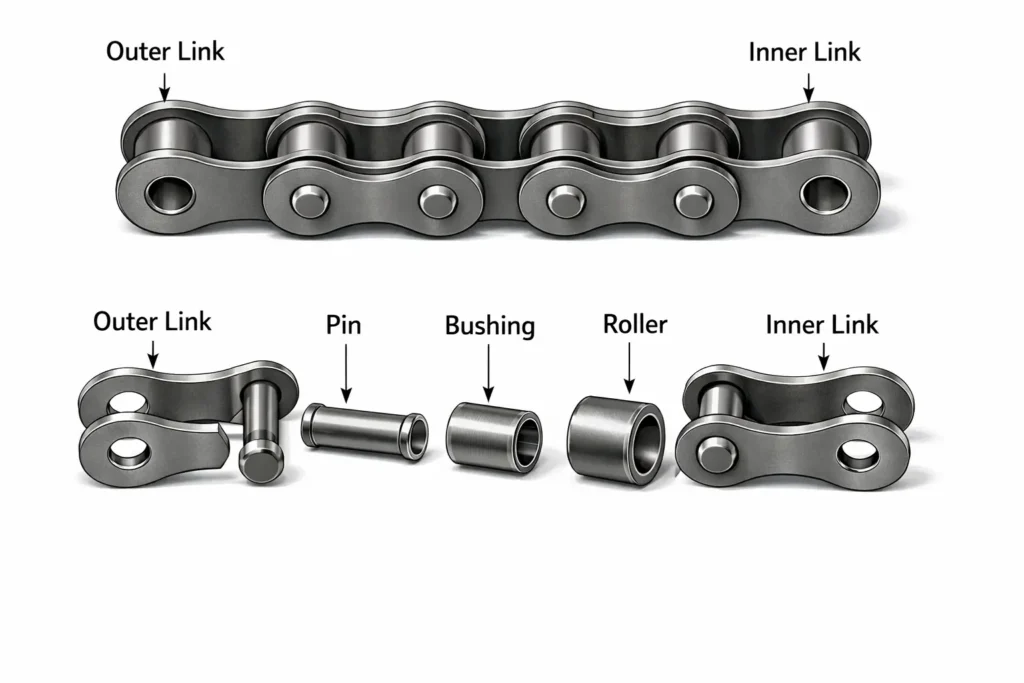
To manipulate a chain without breaking it, you first need to understand how it stays together. Most chains used in power transmission (like roller chains) consist of alternating inner and outer links.
- Inner Links: These consist of two inner plates held together by two hollow sleeves or bushings, with rollers spinning freely over them.
- Outer Links: These consist of two outer plates held together by pins that pass through the bushings of the inner links.
The critical component here is the pin. It is press-fitted into the outer plates to create a tight, secure bond. When you are learning how to take a link out of a chain, you are essentially overcoming this friction fit to push the pin out.
Why does incorrect removal weaken the chain? If you apply uneven pressure, you can warp the plates. If you push a pin out only halfway and then try to twist the chain apart, you will likely widen the holes in the plates, meaning the pin will never sit tight again. Understanding these mechanics is the first step toward safe removal.
Types of Chains and Their Removal Methods
Not all chains are created equal, and the method for removing a link varies depending on the type you are working with.
Roller Chains
Standard roller chains are the most common type found in industrial machinery and motorcycles. They rely heavily on the alternating inner/outer link structure. Removing links usually involves a chain breaker tool that pushes the pin through the outer plate.
Bicycle Chains
While technically a type of roller chain, bicycle chains are narrower and more delicate. Modern multi-speed bike chains (9, 10, 11, or 12-speed) often require very specific chain tools because the tolerances are so tight. Some use a “master link” (or quick link) that can be removed by hand or with special pliers, eliminating the need to push a pin out.
Conveyor Chains
These are often larger and may feature attachments or extended pins. Because they operate under high tension and load, the pins are often thicker and harder to remove. Heavy-duty chain breakers or grinders are sometimes necessary if the chain doesn’t use a master link.
Industrial and Heavy-Duty Chains
For massive chains used in lifting or heavy construction, the pins might be riveted or cottered. Removing links from these chains often requires grinding off the rivet head before using a hydraulic press or heavy hammer to drive the pin out.
Tools Required to Remove Chain Links Safely
Using the right tool for the job is non-negotiable if you want to preserve the chain’s integrity.
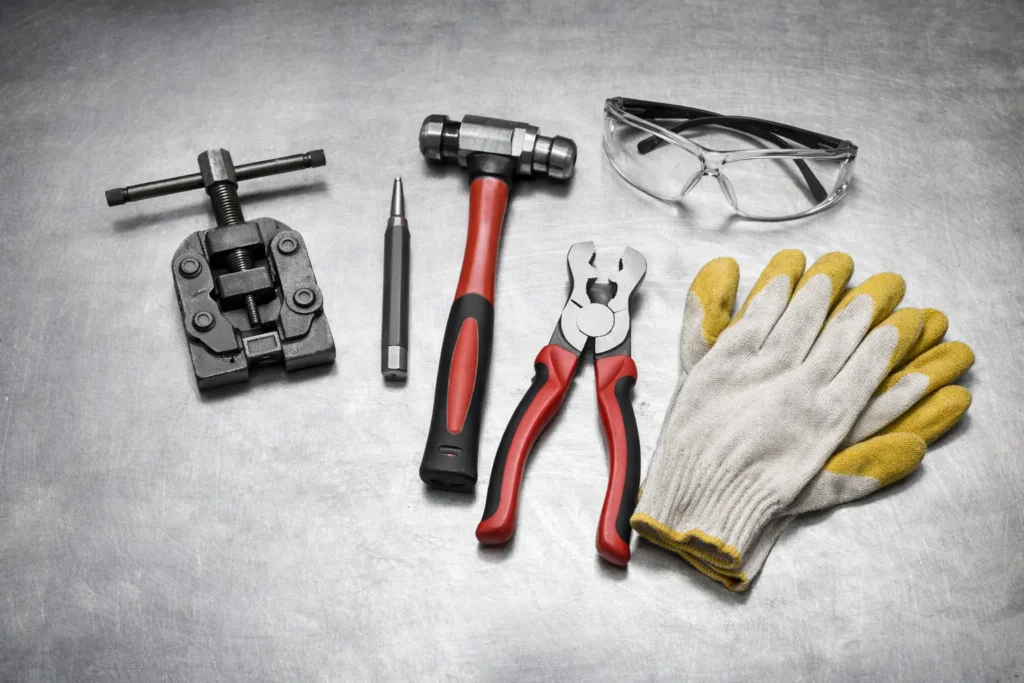
- Chain Breaker Tool: This is the gold standard. It creates a contained environment where a screw-driven pin pushes the chain pin out while supporting the back of the link to prevent bending.
- Master Link Pliers: If your chain has a quick-release link, these pliers make removal instant and effortless.
- Punch and Hammer: For larger chains or in a pinch, a pin punch and a ball-peen hammer can work, provided you support the chain properly.
- Safety Equipment: Always wear safety glasses. Metal splinters can fly off when pins are forced out or if a tool breaks.
- Penetrating Oil: Essential for older chains where rust has seized the components.
Preparation Before Removing a Chain Link
Before you start twisting tools, take a moment to prepare. This minimizes frustration and prevents errors.
First, inspect the chain condition. Clean off excess grease and grime so you can see what you are doing. Look for a “Master Link.” This is a specific link designed to be easily removed. It often looks different from the other links—it might have a clip on the side or be a slightly different color. If you find one, you don’t need to break the chain; you just need to unlock that link.
Next, choose the correct link to remove. If you are shortening a chain, remember that you generally must remove two distinct sections (an inner and an outer pair) to allow the chain to reconnect properly, unless you are using an offset link.
Finally, secure the chain properly. If the chain is still on the machine, shift gears to remove tension (on a bike) or loosen the tensioner (on machinery). If the chain is off the machine, place it on a stable, flat surface or clamp it gently in a vise.
Step-by-Step Guide: How to Remove Chain Links
Follow this process to safely separate your chain.
Step 1 – Locate the Correct Link
Identify exactly where you need the break to occur. If you are replacing a damaged section, you will need to remove the pin connecting the damaged link to the healthy chain. If you are shortening it, measure twice. Remember: once you push a pin all the way out, it is very difficult (and often unsafe) to put that same pin back in.
Step 2 – Secure and Align the Chain
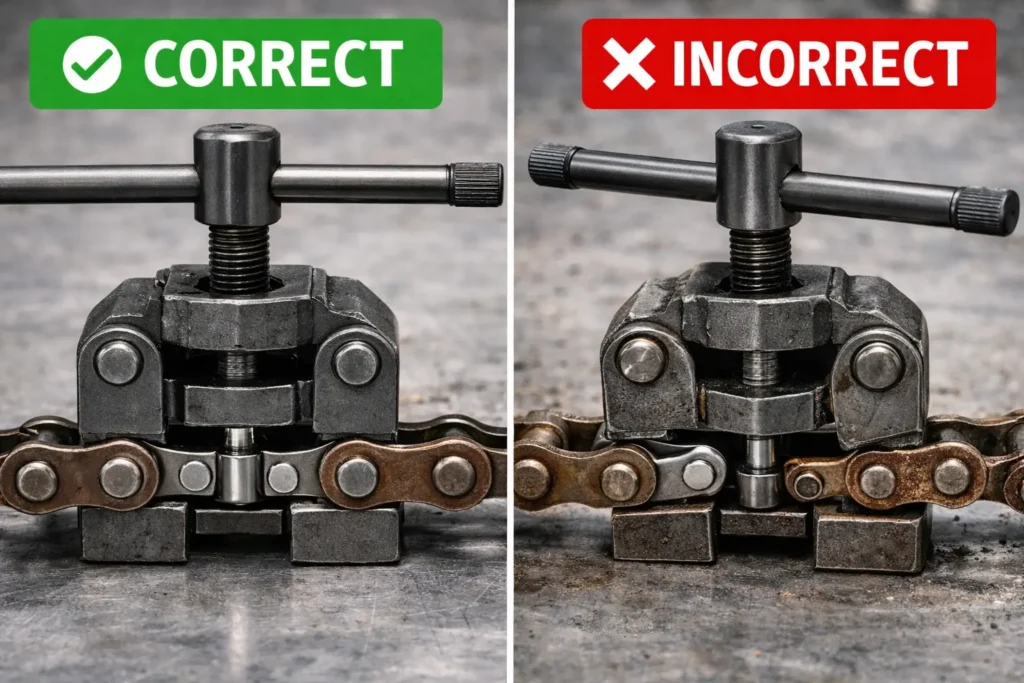
Place the chain into the chain breaker tool. The most crucial part of how to remove links from a chain is alignment. The pin of the tool must be perfectly centered on the chain pin. If it is off-center, you will bend the tool’s pin or damage the chain plate. Ensure the chain is sitting flat in the tool’s cradle.
Step 3 – Using a Chain Breaker Tool
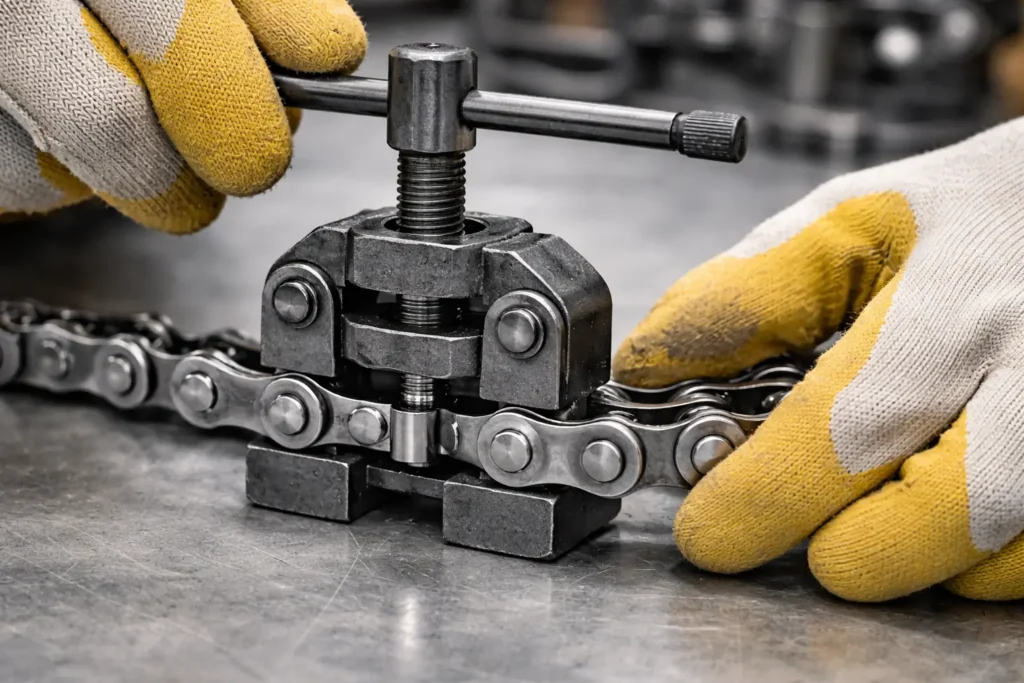
Begin tightening the handle of the chain breaker. Do this slowly. You should feel resistance as the tool makes contact with the chain pin. Continue turning the handle. You will feel a sudden “pop” or release of pressure—this is the friction fit breaking.
Keep turning smoothly. Ensure the chain isn’t twisting inside the tool. The back of the link needs to be braced against the back of the tool to prevent the plates from flaring outward.
Step 4 – Removing the Chain Link Without Damage
Here is the trick: do not push the pin all the way out unless you intend to discard that link or use a brand-new connection pin.
If you plan to reuse the chain, push the pin just far enough that it clears the inner link but remains held in the outer plate. This makes reassembly much easier. If you push it all the way out, getting it started straight again is a nightmare. Once the pin is pushed far enough, back the tool off and gently flex the chain. The links should separate.
Step 5 – Reassembling or Shortening the Chain
To put the chain back together, reverse the process. Mesh the inner and outer links, align the pin with the hole, and use the chain tool to drive the pin back in.
Once the pin is seated, the link will likely be stiff. This is normal. To fix it, grab the chain on either side of the stiff link and flex it laterally (side-to-side) with your thumbs. This slight movement helps seat the plates properly and restores flexibility.
How to Remove Stuck or Rusted Chain Links
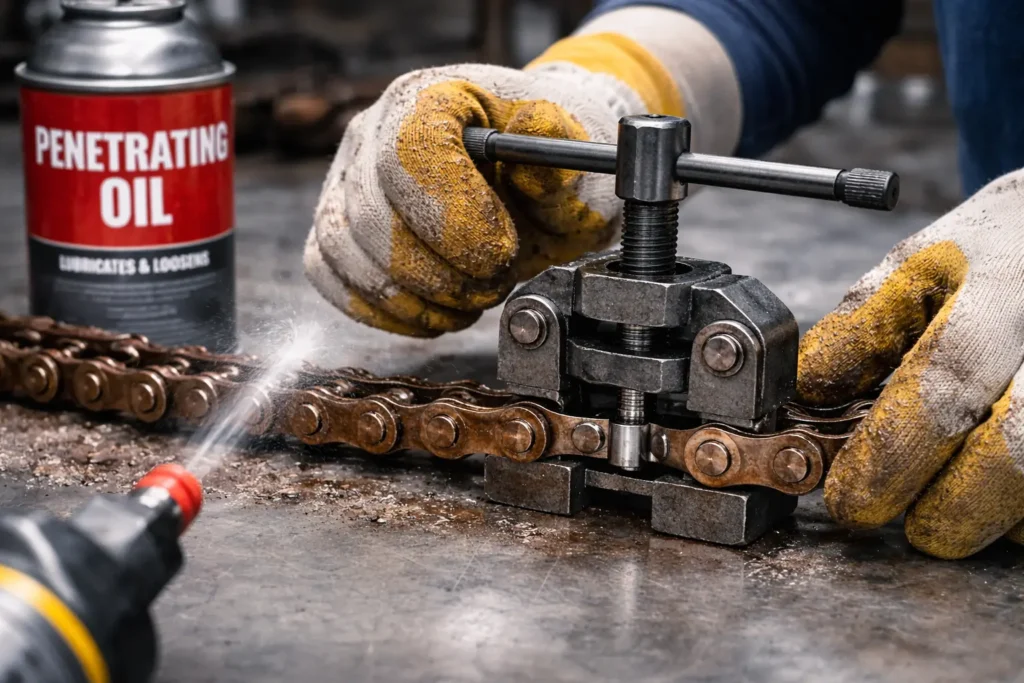
Old, neglected chains present a different challenge. Rust acts like glue, binding the pin to the bushing.
- Use Penetrating Oil: Soak the target link in a high-quality penetrating oil (like PB Blaster or WD-40 Specialist) for at least 15 to 30 minutes.
- Heat (Caution): Mild heat can help expand the metal and break the rust seal, but be careful not to overheat and temper the metal, which weakens it.
- Gradual Pressure: Don’t force the tool. Tighten it until there is significant pressure, then tap the back of the tool handle with a hammer. The vibration often helps break the seizure better than brute force.
Avoid using a grinder unless absolutely necessary, as sparks and heat can damage adjacent links that you might want to save.
Common Mistakes When Removing Chain Links
Even experienced mechanics make mistakes. Avoid these common pitfalls:
- Using Improper Tools: Trying to use a nail and a rock to punch out a pin usually results in bent plates. Always use a proper chain breaker.
- Applying Excessive Force: If the pin isn’t moving, stop. Check your alignment. Forcing it will break your tool.
- Removing the Wrong Link: Double-check your measurements. You cannot easily “add” a link back once it is removed without a master link.
- Improper Reassembly: Leaving the pin protruding too far on one side creates a weak point. The pin should be flush or evenly spaced on both sides of the plate.
Safety Precautions During Chain Link Removal
Chains are metal, and metal can shatter or snap.
- PPE is Mandatory: Always wear safety glasses. If a pin shatters under pressure, the fragments travel fast.
- Secure the Workpiece: Never try to hold the chain in one hand and hammer with the other. Use a vise or a stable bench.
- Watch Your Fingers: Pinch points are everywhere on a chain. Keep fingers clear of the breaker tool’s screw mechanism.
When to Replace a Chain Instead of Removing Links
Sometimes, knowing how to take off a chain link isn’t the solution—you need a new chain. Removing links is a fix for a chain that is too long, but it doesn’t fix a chain that is worn out.
If a chain has “stretched” (which is actually the pins and bushings wearing down, creating more space between links), shortening it won’t solve the problem. The pitch of the chain will no longer match the sprockets, leading to rapid wear on your gears.
Check for:
- Side-to-side play: If the chain has excessive lateral slop, it’s worn out.
- Stiff links: If multiple links are seized and won’t loosen with oil, the chain is compromised.
- Visible rust or pitting: Deep rust weakens the structural integrity of the steel.
In these cases, removing a link is a temporary bandage. Full replacement is the safer, more cost-effective option in the long run.
Frequently Asked Questions
How to take off a chain link safely?
The safest way is to use a dedicated chain breaker tool. Align the tool pin with the chain pin, apply steady pressure to push the pin out, and ensure the chain is braced to prevent bending the plates.
How to remove a link from a chain without weakening it?
Avoid using impact methods like hammers and punches if possible, as these can warp the plates. Use a screw-type chain tool that supports the link. When reassembling, ensure the pin is perfectly centered and the link flexes freely.
How to take a link out of a chain without special tools?
If you lack a chain breaker, you can use a thin punch (or a sturdy nail) and a hammer. Support the chain on a block of wood with a hole drilled in it for the pin to exit. Tap the pin gently to start, then drive it out. Be very careful not to bend the side plates.
How many links can be removed from a chain?
Technically, you can remove as many as needed to achieve the correct length. However, for every “link” you remove to shorten a chain, you are typically removing one inner and one outer section (one inch on a standard #40 chain). Always ensure you have enough remaining length to route through the tensioner properly.
Conclusion
Knowing how to remove chain links properly is about precision, not power. Whether you are adjusting a bicycle chain for a smoother ride or shortening a conveyor chain to keep a production line moving, the principles remain the same. Align your tools, respect the mechanical limits of the metal, and never rush the process.
By using the right tools and following the steps outlined above, you ensure that the remaining chain stays strong, flexible, and safe. A well-maintained chain is the backbone of smooth operation, so take the time to do the repair right.
Looking for the right tools and components?
Avoid risking your equipment with temporary or makeshift repairs. Explore our range of professional-grade chain breakers, replacement links, RS25 Roller Chains, and 40 Double Single Sprockets to ensure every maintenance job is performed safely, efficiently, and to industry standards. If you’re unsure about your chain or sprocket specifications, our expert support team is always available to help you choose the right solution.